Showing posts with label Inspiration Tuesday. Show all posts

Tuesday, October 14, 2008

You've Been Boo'd!

Fall is such a fun time of year, the leaves turning colors, the crisp cool air, and little monsters creeping out to play. Yes, Halloween is on the way! have some spooky fun by leaving a little surprise on a neighbor or friends doorstep, the trick is to not let them see you! Leave a treat and the poem below with the picture and watch how fast the boo travels!


I used this candy tin that I saved to make a extra fun surprise. ***TIP*** take a double look at that tin, box, bottle, or container before you throw it away. You never know what might end up being the perfect shape and size for your next project!


Thanks to the great inspiration over at splitcoast stampers for this spooky Frankenstein idea, and Angie at http://www.chicnscratch.typepad.com/chic_n_scratch/page/2/ I really enjoyed looking at all her cute monster creations!


Just cover your tin with green cardstock. Add a strip of hand cut hair, punch some eyes using a 1 3/8” & 1” circles. Pop a nose up using a 1” circle punch and lastly hand draw some cute stitches and mouth. Fill with candy!


This cute monster can easily be adapted to many types of bags, buckets, and baskets. he would be super cute made just out of a small green paper gift bag.


Now add these instructions and print out this cute sign and have a great time giving out some boo’s!


It all started with a little BOO
A knock upon the door and off they flew!
Halloween is almost here, the leaves are flying by
The pumpkins are ripe, there’s a moon in the sky!
We came by the light of the moon
to bring you this fun surprise.

Put your BOO sign in your window,
and pass on the fun! You have been BOO'd!


Instructions
Please keep it going by following these directions:1. Enjoy your treat.2. Place the BOO sign on your front door or visible in a window.3. Within 2 days, make 2 copies of this note, make 2 treats & 2 BOO signs.4. Secretly deliver to 2 neighbors/friends without a BOO sign.5. Keep an eye on nearby front doors to see how far and fast it spreads by Halloween


Enjoy!
***HeatheR***

Tuesday, June 3, 2008

life, after ICE

Can you believe it? ICE is over? It seemed like months of waiting and then it was all over just like that. I had a blast! And I can't wait for the next scrapbook escape weekend! (even if it has taken me a week and a half to recouperate!)

Remember the power LO I created right here on the blog? Well here it is finished, one of the ONLY things I accomplished the whole weekend.


So, how about you? Did you accomplish a lot at ICE? Post a comment and tell me how many pages you got done at ICE. (there may even be a prize or two involved!) No matter if it was just a card or a bizzillion pages let us know!
Make sure to keep an eye out on the blog for some fun photos from our scrappy weekend to be posted and more information on the Message Board!
Since summer is underway here at our house already I will be taking a break from Inspiration tuesady. but don't be too sad, I'll pop in here & there with LO's, projects, ideas and ICE news as I get the chance between chasing and keeping 3 kiddos happy.
Happy Scrapping
Heather H


Tuesday, April 29, 2008

Create Art!


This has to be one of my favorite creations…maybe ever! I found (and fell in LOVE ) in love with WeRMemory Keepers new White Out line at Just Scrappin’ in Meridian. When approached to make a special something for a special someone I knew exactly what I was going to use! This project was a “by the seat of my pants” kind of project, each piece was uniquely made and evolved as I created, I never really had a vision to start with I just went for it!

I cut out 5 tags out of the White Out Line and then I started to create. Everything used to create my tags was from my personal stash. I enjoyed “throwing out the rules” and just getting lost in art! When creating art like this layers is really key. usally I’m a less is more scrapper, but in this case when I was finished I would stand back and ask myself what else can I put on there, the more the better!


Durring the summer I scout the garage sales for frames and fun items to alter. I found this frame for a whopping .25 (It did have a ugly picture in it-but it was the frame I was after anyhow.) After pulling out the original picture I used the backing to be my guide and base to create on.


Since the frame was longer than my 12x12 paper, I sliced my paper and pieced together on the base cardboard. I did carefully plan where to slice the paper so that the pieced together part would be covered by a tag in the end.


This first tag uses a large Scrapworks photo corner painted then sanded (so to have only the dots painted) attached to chipboard to create a fun & trendy arrow. A Queen & Co. charm that reads “be daring” and lots of fun plastic confetti flowers from Queen & Co. lastly stapled ribbons to the top of the tag.


The second tag was probably the most difficult to put together. maybe because it was the last tag I created, but this one really threw me for a loop. Gladly it all finally came together in the end. Using a junkitz felt flower popped on top of a MAMBI transparency flower. A Making Memories label framing “be Yourself” a rubon from TLC. Punced holes and a soft sheer peach ribbon added to the tag.


The third tag was my favorite to create! Luckily the paper already provided most of the art work. I just layered prima flowers, dusted with glitter in the corners, added a little bling, a great quote rubon, and the darling butterfly was a sticker from doodle bug that I used liquid glue & more glitter to add bling. A sheer dot ribbon tied topped off the tag. (I purposely created different ribbons at the top of the tags to add interest to the finished product)

Tag 4, I used some Doodle Bug paper frills inked with a tangerine chalk. Prima Flowers, Queen & Co. Brads with the words “Be Happy” , an acrylic heart by Heidi Swap with more chalking around the edges and a pretty v shaped ribbon at the top.


And lastly the 5th tag used a coordinating paper form the White Out line as a strip edged with a mini rick rack. More rick rack to make the flower stem. A flower cut from another paper from the same line. The centers of flowers were given an epoxy dimension with crystal effects. Making Memories eyelet word painted and sanded quoting “be an original” (see a theme here? It really wasn’t intentional it just happened that way! I Love art!) And a double looped ribbon stapled to the top.


After I spaced the tags (double checking with the frame edge) I used pop dots to adhere to the black base cardstock.


using a staple gun staple the art back into the frame (making sure to pull out all the old staples first). Also don’t forget to sign the back of your art work as handmade and original!


Wednesday, April 23, 2008

Trash To Treasure

Happy Earth Day!
I thought it would be appropriate to have a fun project that reduces, reuses, renews! Today we are going to be taking Trash and turn it into Treasure!


First you will need a can with a pop top lid (very important) I used a soup can. And a Pampered Chef Smooth Edge Can opener. This can opener is important for this project because it doesn’t cut the lid off, but rather pops the original seal of the can. Keep reading to see why this is a necessary step in this project.


You can purchase this awesome can opener from ICE’s Pampered Chef Vendor Christina Dennis. Just email her at max_memories@yahoo.com to order yours today!


Use the can opener on the BOTTOM of your can


Wash can, and dry thoroughly (and yes, I did clean my sink just for this picture!)


Pull off the label; this will be a great template for later


using the label as a guide cut your pattern paper to size

Glue all the edges down well (when using anything round like this it is important to use glue on all edges, otherwise you’ll get bubbles.) And adhere around the can.

*tip*
for a cleaner look, Line up all the raw edges in one place (in the least noticeable spot either in the back-behind the pull tab or in a spot that will be covered by embellishments.)


Continue to embellish the can as desired (everything for this project came from my scraps…more earth friendly )

For the lid I found a circle lid that was the right size, or a circle punch would work well also.


Cut out a notch where the tab is on the can so the circle can slide underneath (I just eyeballed it)

Add some ribbons to the pull tab and a cute tag


You can add all kinds of fun gifts, I found these great lotions from Bath & Body Works that fit in just perfect. A gift card and some crinkle paper .


Stuff the can with your goodies, make sure the gifts you want the recipient to see first to be put in first and the crinkle paper last. (yes this is my son helping me with the pictures, I don't usally wear Tshirts with motercycles on it...)


Take the lid that you cut off the bottom, put some hot glue around the edges and glue it back to the bottom of the can.


Now your recipient will have a darling gift that they will have to pull the tab at the top to get to. they will wonder how you got a gift in the can, and think you are just the most clever person ever!

ICE has other earth friendly projects on the blog, check out the toilet paper roll gift bag and Heather’s ideas on organizing & storing scraps.


Tuesday, February 26, 2008

Don't throw it out, fix that Photo!

Many of us have them, pictures that aren’t exactly great. Sometimes a special shot doesn’t turn out the way you wanted it to, or its an everyday photo that’s extra sweet. Whatever the case, don’t despair , with a little tweaking in a photo editing software sometimes you can take a not so great shot & turn it into a a good portrait or at the very least a scrapable photo.


There are many types of photo editing software programs out there and likely your PC and/or camera came with one. Not all photo editing programs are the same, but most will get the job done if your just looking for basic editing capabilities. I use Adobe Photoshop Elements. It is a smaller (read much cheaper) version of the full Photoshop. Most photographers and digital scrappers (including me) find Elements to work just fine for them.
In Photoshop you will find almost all your editing options under the enhance tab. When editing photos one of first things I change is contrast. You will usually find this under the lighting button. By bumping up the contrast on your photos you immediately get more vibrant colors and deeper tones in your photograph. And if you ever swap out a color photo to Black & White use contrast to get those deep blacks and crisp whites that will make your photo really pop!
Sometimes if the lighting is overexposed (like in my photo) or underexposed using the contrast in conjunction with the brightness will help you achieve the look your going for.

Hue & saturation. What bright & vibrant colors in your photos? In Photoshop under the color button select Hue & Saturation. Use the sliders to enhance the colors or bring out a new hue. You can change the master color to a color like blue and using the saturation slider to deepen or lessen the blues in your photo. use a dominate color in your photograph and bump it up for a wow look. Just remember many times when using H&S less is more. But as with most things this is not an absolute- you’re the artist! I promise you once you start playing with this feature you will be so addicted!!



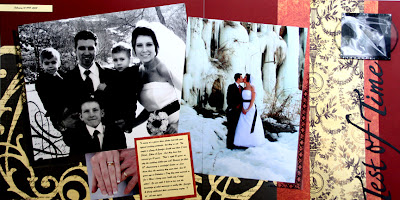
In this LO I used the Hue & saturation to add color to my photos to get this neat effect.


Diffuse Glow, another one of my favorite tools. I find the glow filter under the filters and Distortion tab. This effect is awesome especially on Black & White Photos (which can easily be done using the black & white button or filter) but can also work beautifully in color too. You can choose the intensity, & grain to achieve the look your going for. In this photo I kept a high amount of grain along with the glow to give my photo that edgy look.


And don’t forget about the crop button! I use it all the time. To clean up my photos from loose cropping & distracting backgrounds. Play with it a bit crop in unexpected ways by going in super close or setting it at an angle-you’ll be surprised at how a picture can take on a whole new look with this necessary tool!

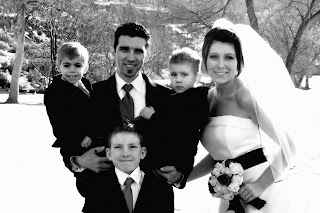
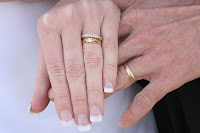
And in case your wondering, these photos are of my lovely sister, her Husband, & 3 kids. They actually celebrated their 10 year anniversary on Valentines day and decided to renew their vows with a wedding that they never had. (10 years ago they were married in our Mom’s living room with only days notice!)Now you all can say “AWWWW How Sweet!”

Tuesday, February 19, 2008

Magnet Board


This week’s Tuesday Inspiration is such a fun project! I have to give credit to my friends Tricia & Tracy for this great idea! We are going to make a personalized magnet board, not only is it easy but its very time & cost effective! ( how can a scrap project get any better??)


Supplies:
You will need a Trimmer, Adhesive, Scissors, Ruler, Cropadile , 12x12 (or any size really) metal sheet. I found mine at Craft Warehouse for 2.99 Three pattern papers (Making Memories noteworthy collection used), Coordinating Cardstock (Bazzil), Clear buttons (Stampin’ Up!), Chipboard Flowers (Making Memories), Wide Ribbon (Offray), Ink (Colorbox chalk Ink Rouge, Azure, & Chestnut Roan ), magnets (I used small round ones & magnet tape), *optional* Monogram Chipboard letter (pressed Petals), small tag, sticker letters (Chatterbox), paper flower (Prima) & ribbon (offray).


Adhere your 12x12 Pattern paper to the board. (I used just plain Mono & it works great just make sure to get all the edges glued down well so you don’t get any lifting)


I trimmed a pre-cut scalloped circle Pattern Paper in ½ & chalked the edges in brown. Then adhere to one edge of your board.


Chalk the rest of the edges of your board. Although chalking/inking is not a necessary step in this project I love the defined look it gives, and how it makes my paper “pop”.


Generously apply adhesive to the FRONT side of your chipboard flower. Then place it on the BACK SIDE of your cardstock (if your using a textured cardstock or a pattern paper this is very important!) & cut out.


Use a pencil to trace your button to the BACK SIDE of your pattern paper. Using a good clear adhesive (mono works fine if you rub the back of your paper with your fingernail to get an even glue line, or a clear liquid glue also works great. )


Adhere your button centers to your chipboard flowers
To make your flowers into magnets, glue a round magnet to the back. Use a good bonding glue for this step or your magnets will rip away from your chipboard with use. I recommend something like the Stampin’ up Crystal effects of even hot glue. **TIP** Some magnets will leave a smudge on your paper. To avid this paint the magnet with clear fingernail polish before gluing to your chipboard. Making sure to let the polish dry for 30-45 minutes before using on your board.


Measure in 1 inch from the top and 2 inches from the side, on both sides


Use Cropadile to punch 2 holes. (I love this handy little tool! You should have seen how giddy I was the first time I tried it on a metal sheet! Its so fun!!)

Use about a yard of wide ribbon, thread it from the backside of the board and tie with a knot. repeat on the other side/hole.


For an extra special touch I also added a large monogram letter for the recipient .I covered the letter in Pattern Paper then flipped over and added a long strip of magnet tape. This tape comes in a roll and can want to curl up on you, the adhesive backing it has doesn’t hold very well, so I suggest also gluing it down with a good bonding glue.


I embellished the letter a bit with a ribbon & tag with my friends Name.


Now your boards ready to hang! This makes a great gift for just about anyone. you can customize the paper & magnet embellishments to fit the recipients likes. You can also make the board like a completed LO, and all the recipient needs to do is change out the pictures! Or make a calendar grid and the magnets as numbers so you can have a perpetual calendar! the possibilities are endless!