Thursday, February 28, 2008

You're a VIP!

I'm a little late getting the Thursday "Cool Talk" post up this evening. I was working on a project with my soon to be nine-year-old daughter. Like millions of nine-year-old girls out there's she's crazy for Hannah Montana, so we're having a Hannah Montana/Rock Star Birthday Party. We worked on these fun invitations tonight and had a great time. She's quite a little scrapper.

Well, the VIP badges got me to thinking. Thinking about YOU! :) I'm so excited for ICE because, if for just one weekend out of the year, you get to come and be treated like a true VIP. We, as women, it seems tend to always take second place. We put the kids first, out spouse first, our jobs first, volunteering first, even cleaning the darn house first! Sometimes we just have to step back and put ourselves first and spoil ourselves a little! That's what we plan to do at ICE - we plan on spoiling you, celebrating you, pampering you, and renewing your spirit. We picture tables of old friends sharing stories and memories laughing, crying - whatever. We picture that one women who's been so overwhelmed because she hasn't had a chance to complete that big project leave with a sense of accompishment and pride because she's finally done. We see the new scrapper meeting new friends, learning new tricks, and getting excited to continue on with more projects. We look forward to the seasoned scrapper sharing some neat ideas, winning a contest, and maybe taking a class to even learn something new.

With only two days left until Early Bird Registration is over - here's your VIP pass! We hope you take advantage of the savings and sign up. Also encourage some of your friends and family to come join you at ICE. I'm sure you know someone who deserves a break, deserves to be spoiled, and deserves to be a VIP for a weekend!

Oh - By the way, I loved reading everyone's wish list from last week! This week, share your favorite way to pamper yourself! For me - it's getting a pedicure! Ahhhh! Spring's coming, I need to get in and get one I think!

So for this Leap Day - Leap on over to the website and save the money for Early Bird Registration while you still can! Then start packin' your bags and planning your projects 'cause ICE will be here before we know it!


We'll see you there! :)

Tuesday, February 26, 2008

Don't throw it out, fix that Photo!

Many of us have them, pictures that aren’t exactly great. Sometimes a special shot doesn’t turn out the way you wanted it to, or its an everyday photo that’s extra sweet. Whatever the case, don’t despair , with a little tweaking in a photo editing software sometimes you can take a not so great shot & turn it into a a good portrait or at the very least a scrapable photo.


There are many types of photo editing software programs out there and likely your PC and/or camera came with one. Not all photo editing programs are the same, but most will get the job done if your just looking for basic editing capabilities. I use Adobe Photoshop Elements. It is a smaller (read much cheaper) version of the full Photoshop. Most photographers and digital scrappers (including me) find Elements to work just fine for them.
In Photoshop you will find almost all your editing options under the enhance tab. When editing photos one of first things I change is contrast. You will usually find this under the lighting button. By bumping up the contrast on your photos you immediately get more vibrant colors and deeper tones in your photograph. And if you ever swap out a color photo to Black & White use contrast to get those deep blacks and crisp whites that will make your photo really pop!
Sometimes if the lighting is overexposed (like in my photo) or underexposed using the contrast in conjunction with the brightness will help you achieve the look your going for.

Hue & saturation. What bright & vibrant colors in your photos? In Photoshop under the color button select Hue & Saturation. Use the sliders to enhance the colors or bring out a new hue. You can change the master color to a color like blue and using the saturation slider to deepen or lessen the blues in your photo. use a dominate color in your photograph and bump it up for a wow look. Just remember many times when using H&S less is more. But as with most things this is not an absolute- you’re the artist! I promise you once you start playing with this feature you will be so addicted!!


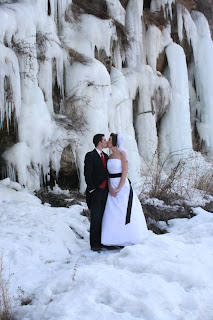
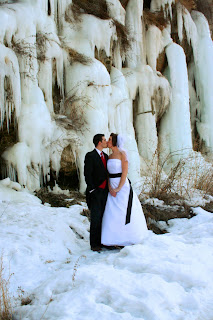
In this LO I used the Hue & saturation to add color to my photos to get this neat effect.


Diffuse Glow, another one of my favorite tools. I find the glow filter under the filters and Distortion tab. This effect is awesome especially on Black & White Photos (which can easily be done using the black & white button or filter) but can also work beautifully in color too. You can choose the intensity, & grain to achieve the look your going for. In this photo I kept a high amount of grain along with the glow to give my photo that edgy look.


And don’t forget about the crop button! I use it all the time. To clean up my photos from loose cropping & distracting backgrounds. Play with it a bit crop in unexpected ways by going in super close or setting it at an angle-you’ll be surprised at how a picture can take on a whole new look with this necessary tool!

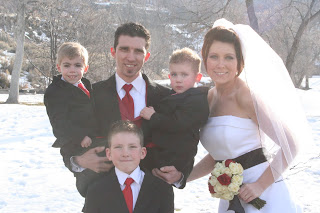
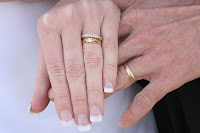
And in case your wondering, these photos are of my lovely sister, her Husband, & 3 kids. They actually celebrated their 10 year anniversary on Valentines day and decided to renew their vows with a wedding that they never had. (10 years ago they were married in our Mom’s living room with only days notice!)Now you all can say “AWWWW How Sweet!”


Thursday, February 21, 2008

Time to start some "Cool Talk" on ICE

We've been thinking of other ways we can use our blog as a tool of inspiration. So, starting now and every Thursday we're going to do a "Cool Talk" segment. Topics will range from all kinds of things. Blurbs so you can get to know the three of us better before, ideas to inspire your scrapbooking, inspire you in your personal life, feature a "cool" idea- project- store-product-whatever, or just something to make you laugh. Our goal is to start some communication, chatter, and such before the big event in May. Then you'll be fully inspired, ready to scrap, and might even recognize a name or two when you get there. Please participate in the discussions by posting in comments on the blog, or if you'd like you can e-mail us.

So, for the first segment let's talk about wishes - scrapbooking wishes! :) This is a two part discussion:
A - The Genie List: If money, time, circumstances were no object, and the scrapbook genie appeared to grant you three wishes - what would you wish for? Would it be a special talent? A big ticket item? Something wild and out of this world? An ambition finally realized?
B - The Possible List: THEN give us a wishlist of three wishes that could possibly actually happen, a more realistic list. What product are you dying to have? What class are you wishing you could take? What talent do you wish you had? What trip, event, etc would you love to be able to do? What scrapbook celeb would you want to meet? Tell us all your ideas, you never know, one of your wishes just might be granted at ICE. :)

Here's my (Tracy's) list, I'm sure Nancy and Heather will post theirs soon too.
"Genie" Wishlist:
1. More time to Scrap! Don't you wish that scrapping time went by as slowly as other time. What happens when you start scrapping? That clock seems to go into warp speed. Then, for me, three hours later you look down at your finished layout and wonder how the last three hours went by in the blink of an eye! :)
2. The ultimate scrapbook room designed, decorated, and organized by someone else, or at least someone to help me do it. I'm not good at that kind of thing, but admire people who are. I have probably 50 scraprooms bookmarked with the thought of "some day".
3. Dishes that washed themselves, laundry that washed, folded, ironed and put itself away, floors that vacuumed themselves, dust to never accumulate, bathrooms that was always sparkling clean, weeds that never grew, and while I'm at it a personal chef. Just think of all the scrapping time I'd have! :)

"Possible" Wishlist:
1. A weekend at ICE (of course)
2. A cutting system, I have yet to take the plunge into the Cricut or Silhouette or other cutting system
3. A really good photography class to be able to use my Digital SLR camera better

I can't wait to read your responses! Have fun! Get ready... Make A Wish!


Wednesday, February 20, 2008

Counting Down to Early Bird

10 days & counting! If you haven't signed up for the Treasure Valley's Greatest Scrapbooking Event yet, there are only 10 days left to get in while its on sale! And remember, all Early Bird Registrations will go into a drawing for a chance at a FREE spot at ICE! Yep, thats 3 days of cropping, shopping, freebies, prizes, games, and so much more for FREE!
Visit http://www.iceescape.net/ and click on the cute Birdie to get registered!

Top 10 Reasons to Not Miss ICE
10: Three days of no whining kids (or Husbands)!

Tuesday, February 19, 2008

Magnet Board


This week’s Tuesday Inspiration is such a fun project! I have to give credit to my friends Tricia & Tracy for this great idea! We are going to make a personalized magnet board, not only is it easy but its very time & cost effective! ( how can a scrap project get any better??)


Supplies:
You will need a Trimmer, Adhesive, Scissors, Ruler, Cropadile , 12x12 (or any size really) metal sheet. I found mine at Craft Warehouse for 2.99 Three pattern papers (Making Memories noteworthy collection used), Coordinating Cardstock (Bazzil), Clear buttons (Stampin’ Up!), Chipboard Flowers (Making Memories), Wide Ribbon (Offray), Ink (Colorbox chalk Ink Rouge, Azure, & Chestnut Roan ), magnets (I used small round ones & magnet tape), *optional* Monogram Chipboard letter (pressed Petals), small tag, sticker letters (Chatterbox), paper flower (Prima) & ribbon (offray).


Adhere your 12x12 Pattern paper to the board. (I used just plain Mono & it works great just make sure to get all the edges glued down well so you don’t get any lifting)


I trimmed a pre-cut scalloped circle Pattern Paper in ½ & chalked the edges in brown. Then adhere to one edge of your board.


Chalk the rest of the edges of your board. Although chalking/inking is not a necessary step in this project I love the defined look it gives, and how it makes my paper “pop”.


Generously apply adhesive to the FRONT side of your chipboard flower. Then place it on the BACK SIDE of your cardstock (if your using a textured cardstock or a pattern paper this is very important!) & cut out.


Use a pencil to trace your button to the BACK SIDE of your pattern paper. Using a good clear adhesive (mono works fine if you rub the back of your paper with your fingernail to get an even glue line, or a clear liquid glue also works great. )


Adhere your button centers to your chipboard flowers
To make your flowers into magnets, glue a round magnet to the back. Use a good bonding glue for this step or your magnets will rip away from your chipboard with use. I recommend something like the Stampin’ up Crystal effects of even hot glue. **TIP** Some magnets will leave a smudge on your paper. To avid this paint the magnet with clear fingernail polish before gluing to your chipboard. Making sure to let the polish dry for 30-45 minutes before using on your board.


Measure in 1 inch from the top and 2 inches from the side, on both sides


Use Cropadile to punch 2 holes. (I love this handy little tool! You should have seen how giddy I was the first time I tried it on a metal sheet! Its so fun!!)

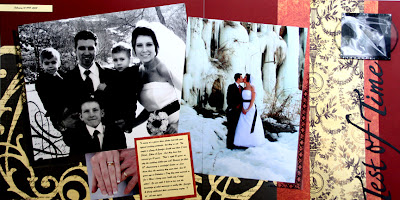
Use about a yard of wide ribbon, thread it from the backside of the board and tie with a knot. repeat on the other side/hole.


For an extra special touch I also added a large monogram letter for the recipient .I covered the letter in Pattern Paper then flipped over and added a long strip of magnet tape. This tape comes in a roll and can want to curl up on you, the adhesive backing it has doesn’t hold very well, so I suggest also gluing it down with a good bonding glue.


I embellished the letter a bit with a ribbon & tag with my friends Name.


Now your boards ready to hang! This makes a great gift for just about anyone. you can customize the paper & magnet embellishments to fit the recipients likes. You can also make the board like a completed LO, and all the recipient needs to do is change out the pictures! Or make a calendar grid and the magnets as numbers so you can have a perpetual calendar! the possibilities are endless!

Thursday, February 14, 2008

Happy Heart Day

I know, for some, today's holiday wants to make you gag. But I for one really enjoy Valentines Day. Not for the mushy love stuff but for the fun kid stuff, valentines cards, boxes, & candy! As a scrapper I get giddy thinking of pulling out my stamps and scrap stash to make one of a kind unique cards for my kids to pass out...WRONG! They won't have anything to do with a homemade valentine, I have lost the battle to Spongebob, Ninja Turtles, & Dora-sigh!

BUT this year was different! I had all but given up hope to create valentines for my kids that didn't include some sort of cartoon character, until I suggested to my oldest son that we buy this fun "pop rock" candy and make some cool "rocker" valentines to go with it. To my udder amazement he said "yeah". Now this wasn't just a blah "yeah" but an enthusiastic "yeah!" Woohoo!!


Well as some of you who know me well, know that Photoshop has not always been my friend. I'm slowly learning the ropes though. I wanted to create a Valentine that would be "cool" enough for a 10 year old boy to pass out, and this is what I came up with. I was pretty proud of myself I have to say. maybe I'm getting this PSE thing down! Double Woohoo!


Tuesday, February 12, 2008

Oh Scrap!


Oh Scrap! We are talking about scraps this week! You know you have them, they are overflowing and your sure that they are multiplying when you’re not looking. And if your like me, I just can’t seem to part with them whether they be barley small enough to get a punch out of or as big an almost full sheet of paper. But with a bit of organization and planning you can make great use of those scraps!

I organize my scraps in totes and 12x12 page protectors.


You can find these totes at most discount stores, they are cheap & they work great. I also have seen people organize their scraps in expandable folders or in hanging files which are also is a great ideas.


Because I have so many scraps, I organize them by color. I have 1- 12x12 page protector for each color in cardstock and in pattern paper and one extra protector for “multi” colors (for when I just can’t decide on what color it belongs to!)

One way to help keep your scraps tidy is to trim your scraps into squares/rectangles before filing them away. Because odd shaped and jagged edges have a tendency to catch onto other papers.

Also try to get in the habit of putting your scraps away at the end of a project. Or at least dedicate a spot to accumulate your scraps like a bin and when its full (OK overflowing) spend some time getting them put away-because when your scraps are organized you will get the most out of them and actually USE them!


And lastly I keep my scraps right next to my desk so they are at my fingertips when I need them. This way I opt to reach for my scrap bin before cutting into a new sheet of paper.


Scraps are great for making cards, photo mats, journaling blocks and so much more! I challenged myself to make a LO out of scraps only (minus the background paper). And what would Inspiration Tuesday be without a project to inspire? So lets get started!


Supplies:
Trimmer, scissors, adhesive, & pencil, 1 sheet of red cardstock, heart template (bazzil pre-cut cardstock heart used-or just try free handing a heart), sticker letters (American Crafts Thickers), chipboard brackets (Maya Road), White acrylic paint, & lots of scraps in a pink/red color theme.


First lightly trace your heart onto your background cardstock


After selecting several papers out of your scrap stash start tearing them into small squares. pay special attention to leave white core on all the sides.

When you think you have torn enough squares, tear a few more just for good measure :0)

Start gluing your torn squares to around the outline of your heart

Mat your photo using additional scraps. It is important to ground your photo with a busy background.


Do some journaling and trim to strips (unfortunately when using a printer its is difficult to use scraps)


Adhere your sticker letters, love title (more scraps from a Reminiscent paper) hand cut heart (out of scraps of course), painted chipboard brackets, journal strips and photo. And there you go, LO created out of scraps! Doesn’t it feel great to use up some of that great paper?

Here’s another LO using the same heart/scraps concept. In this LO I created 2 pages and added more journaling.


Now its up to you to take the scraps challenge! Go get those scraps organized and use them! And if you have a great tip on how to organize & use scraps. Post a comment and share it with us!

Saturday, February 9, 2008

February Contest Challenge!!


Here it is! The February Challenge! Create a layout about someone special in your life. The layout can feature anyone special to you - Your sweetie, your children, parents, grandparents, a good friend, or even a four legged furry creature. There's a catch though, you have to create the layout based on this sketch!

Submit your completed layout by March 1st to info@iceescape.net and you could be a winner of some fabulous prizes!! We'll be looking for: Overall appearance, creativity, craftsmanship, and how well you feature your special someone.

Here's our very own Tracy's take on the sketch. Her special someone is her daughter Hailey, the aspiring rock star dressed in her Halloween costume from last year.


Good Luck and Have Fun